
Amazon Web Services enables you to create a custom defined virtual network also know as Amazon VPC or Amazon Virtual Private Cloud, which, just like any traditional network in a data center, is highly scalable and easily configurable using programming languages like Python. In this article we will demonstrate how to automate creating an AWS VPC and configure a custom virtual network.
This will let you deploy infrastructure components like EC2 instances on AWS using the AWS SDK for Python also known as the Boto3 library. Please refer to my previous article here to grant programmatic access from AWS and setup the environment local computer with AWS credentials.
Let’s start by creating a basic VPC in AWS Cloud and then we'll configure it to our requirement in later sections of this article.
Create a VPC
First thing's first let’s import the boto3 library in Python create an ‘ec2’ resource object using the method ‘resource()’ after that using the create_vpc() method create a virtual private network by passing the CIDR notation as an argument to named parameter ‘CidrBlock’. CIDR notations are compact representations of the IP addresses and its associated routing prefix like '192.168.0.0/16'.
import boto3
ec2 = boto3.resource('ec2')

# create VPC
vpc = ec2.create_vpc(CidrBlock='172.16.0.0/16')
Once the VPC has been created you ca even name it using the create_tags() method.
# assign a name to our VPC

vpc.create_tags(Tags=[{"Key": "Name", "Value": "my_vpc"}])

vpc.wait_until_available()
Now we can also enable the Public DNS Hostnames by calling the client method of boto3 library and then accessing the modify_vpc_attribute() method, so that we can access the public DNS names of the EC2 instance we would be creating in this VPC.
# enable public dns hostname so that we can SSH into it later
ec2Client = boto3.client('ec2')
ec2Client.modify_vpc_attribute( VpcId = vpc.id , EnableDnsSupport = { 'Value': True } )
ec2Client.modify_vpc_attribute( VpcId = vpc.id , EnableDnsHostnames = { 'Value': True } )
 Creating an Internet Gateway and Attaching it to the VPC
You can control internet access to the instances in your VPC. If you want to make your EC2 instances available on the internet, then you have to first create an Internet Gateway and then attach it to your VPC.
# create an internet gateway and attach it to VPC
internetgateway = ec2.create_internet_gateway()
vpc.attach_internet_gateway(InternetGatewayId=internetgateway.id)
Creating a Route Table and an Associate Route Table with the Subnet
Now we'll create a Route Table in the VPC using the create_route_table() method, and then create a new route which will ge attached to the internet gateway we created earlier, to establish a public route.
# create a route table and a public route
routetable = vpc.create_route_table()
route = routetable.create_route(DestinationCidrBlock='0.0.0.0/0', GatewayId=internetgateway.id)
Finally, we'll create a subnet in the VPC and associate it to the route table.
# create subnet and associate it with route table
subnet = ec2.create_subnet(CidrBlock='172.16.1.0/24', VpcId=vpc.id)
routetable.associate_with_subnet(SubnetId=subnet.id)
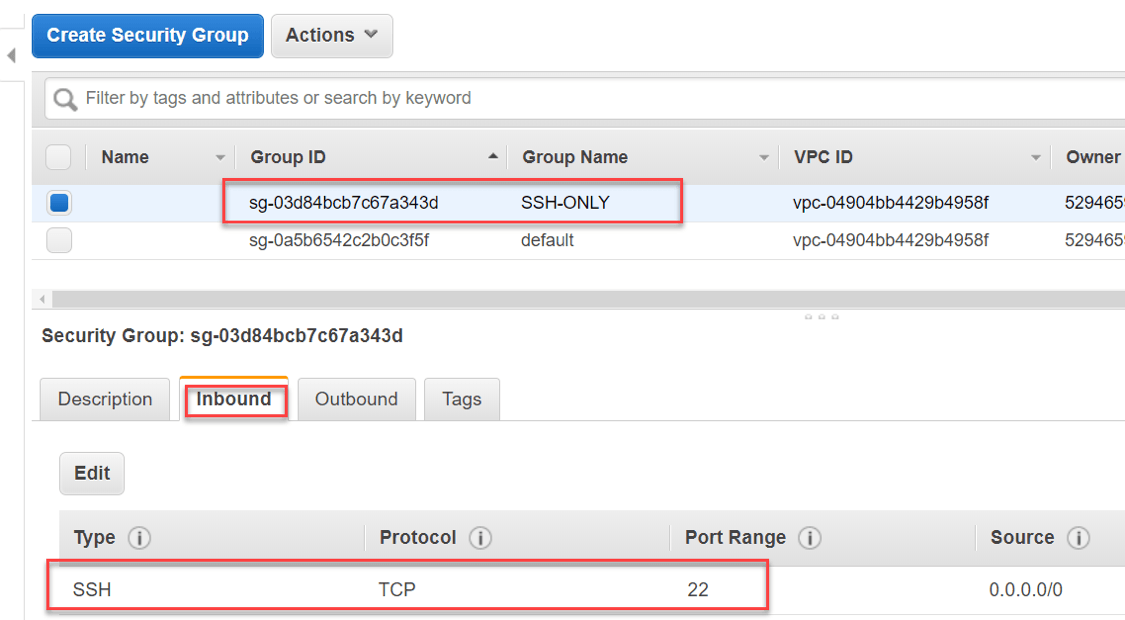
Creating a Security Group and Defining the In-Bound Rules
We'll now set up a new security group using the create_security_group() method, and assign it to our VPC. Then we'll define an inbound rules to only allow SSH port number 22.
# Create a security group and allow SSH inbound rule through the VPC
securitygroup = ec2.create_security_group(GroupName='SSH-ONLY', Description='only allow SSH traffic', VpcId=vpc.id)
securitygroup.authorize_ingress(CidrIp='0.0.0.0/0', IpProtocol='tcp', FromPort=22, ToPort=22)
 Creating an AWS EC2 Instance in the VPC
Once the security group is set up, we'll create a new key pair to SSH into our EC2 instances, then store it t a local file: 'ec2-keypair.pem'
# create a file to store the key locally
outfile = open('ec2-keypair.pem', 'w')

# call the boto ec2 function to create a key pair
key_pair = ec2.create_key_pair(KeyName='ec2-keypair')

# capture the key and store it in a file
KeyPairOut = str(key_pair.key_material)
outfile.write(KeyPairOut)
Finally, we'll launch a new Linux EC2 instance and pass the name of the key pair to the named parameter KeyName of the create_instances() method.
# Create a linux instance in the subnet
instances = ec2.create_instances(
 ImageId='ami-0de53d8956e8dcf80',
 InstanceType='t2.micro',
 MaxCount=1,
 MinCount=1,
 NetworkInterfaces=[{
 'SubnetId': subnet.id,
 'DeviceIndex': 0,
 'AssociatePublicIpAddress': True,
 'Groups': [securitygroup.group_id]
 }],
 KeyName='ec2-keypair')
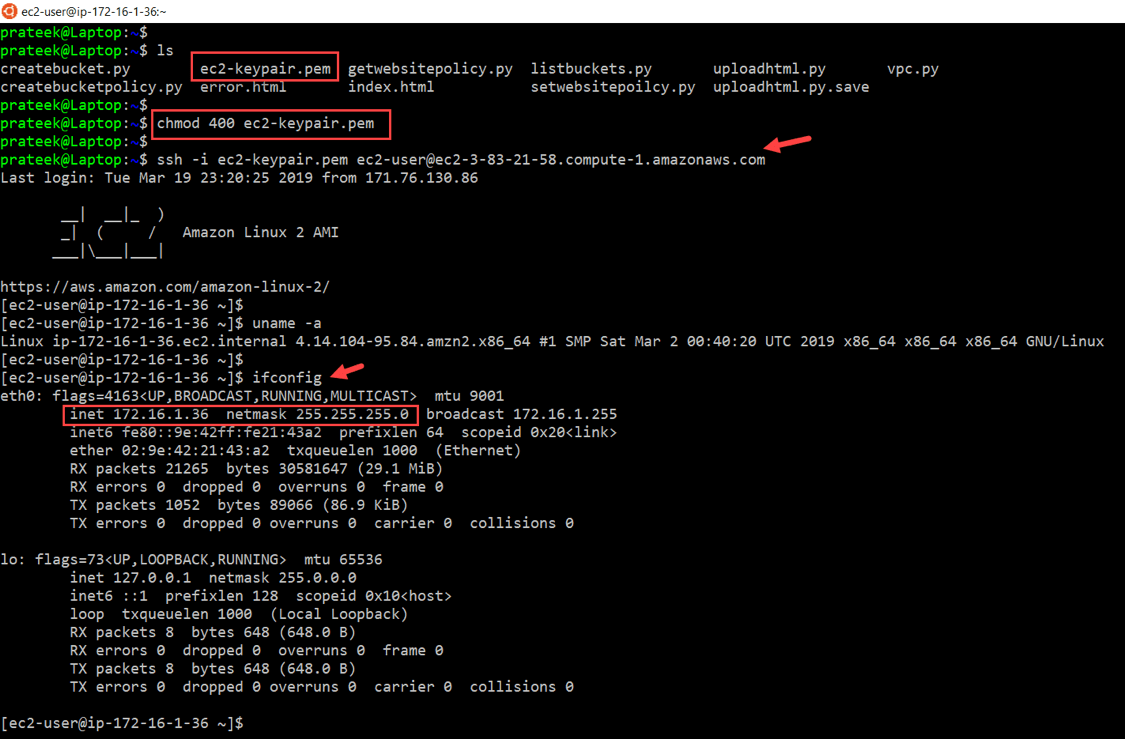
It will take just a few minutes to launch your Linux EX2 instance in the VPC we just greated. Meanwhile, we'll change the mode of the file on which we stored our key pair t read-only mode. This is require if you want to SSH into your Linux virtual machines in AWS.
chmod 400 ec2-keypair.pem
Now, in the AWS console under the EC2 dashboard, you can search for your virtual machines and find the public DNS name of the virtual machine we just launched. Then we can SSH into the EC2 instance using the key pair file and the Public DNS as demonstrated in the following image.
I hope you found this tutorial useful, we'll be back soon with further Python tutorials. Until then you can check out the rest of the How-to articles on the Ipswitch site.