
In this article, you’re going to learn how to create a simple Azure ARM template and deploy it into Azure using the Azure CLI.
If you’re still manually building resources in the Azure Portal, there’s a much better way - Azure Resource Manager (ARM) templates. Azure ARM templates allow you to define one, ten, or 100 different components in Azure to create them all at once. They are also idempotent, meaning repeated deployments will only update what’s changed.
ARM templates are JSON files that can be created with any text editor. Each Azure ARM template defines each resource to create (or update) along with various attributes and configuration settings.
When you finish creating an ARM template, what is next? Deployment. Using a few different methods, you can deploy Azure resources via a single ARM template via PowerShell, Azure CLI, among others.
Understanding Azure ARM Template Syntax
ARM templates are like snowflakes - no template is alike. Every ARM template is going to look a little different depending on the resource to provision, and it’s attributes. But, the following JSON snippet does represent a common schema each template must follow.
{
  "$schema": "https://schema.management.azure.com/schemas/2015-01-01/deploymentTemplate.json#",
  "contentVersion": "",
  "parameters": {  },
  "variables": {  },
  "functions": [  ],
  "resources": [  ],
  "outputs": {  }
}
- $schema - This attribute represents the JSON file used to validate the schema. For resource group deployments, it will look like https://schema.management.azure.com/schemas/2015-01-01/deploymentTemplate.json#.
- contentVersion - This is a user-defined attribute that represents the version of the Azure ARM template itself. This attribute is great for keeping track of changes made to the ARM template.
- parameters - An ARM template doesn’t have to contain static values. You can pass parameters to the template at run time. This is where you would define those parameters.
- variables - The template schema allows for variables. This is where you will define any variables to reference throughout the template.
- functions - A useful feature of ARM templates is the ability to run expressions. In this attribute, you can define common expressions and call them throughout the template.
- resources - This is the section that will be, by far, the largest. In this section, you will define all of the resources to deploy to Azure.
- outputs - By default, ARM template deployments don’t return anything. If you need to return anything from the template, like a dynamically generated component, this is where you will do that.
Building and Azure Arm Template
Building an Azure ARM template can be a daunting task. ARM templates can grow into the thousands of lines! If you’re just getting started, it’s best to use an example. Rather than creating your own, download the *Very simple deployment of a Windows VM* ARM template found on GitHub.
For hundreds of examples of how to build ARM templates, be sure to check out all of the Azure Quickstart Templates on GitHub.
Ensure you download both the azuredeploy.json and azuredeploy.parameters.json files.
We don’t have near enough time in this tutorial to explain the ARM template in depth. I encourage you to review the template and parameters ahead of time. Also, be sure to check out the handy ARM visualization link to see what resources the deployment creates once the deployment runs.
Invoking an Azure ARM Template Deployment
When you have the ARM template and optional parameters file, you can now initiate the deployment to create the resources.
Assuming you’ve downloaded the Azure CLI and have authenticated, let’s now create a resource group to deploy to. Most ARM templates will deploy to resource groups. Templates also support deployment to subscriptions too.
This tutorial will be using a resource group called ARMTemplateTutorial located in the East US Azure region. You’ll see how to create this resource group in the following snippet.
az group create --name *ARMTemplateTutorial* --location "East US"
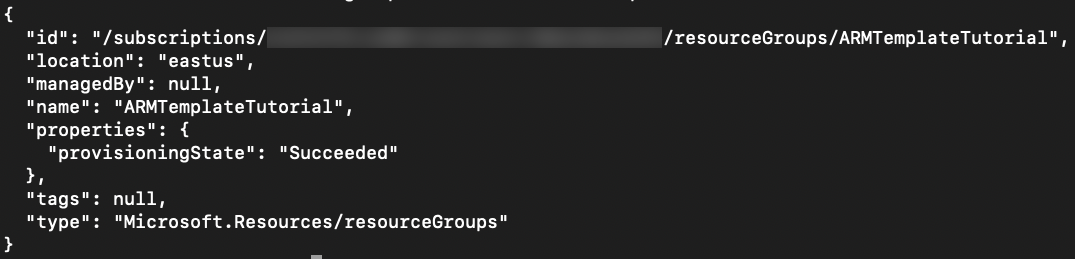
When the above command is complete, you will see a JSON output like the following screenshot.
Once you have a resource group created, you can then deploy all resources in the ARM template using the az group deployment create command.
In the following snippet, the Azure CLI is:
- creating an ARM deployment called ARMTemplateTutorial
- deploying all resources in the template to the ARMTemplateTutorial resource group
- using the template file downloaded earlier called json
- reading the parameters file called parameters.json which passes values to the deployment
- az group deployment create
–name ARMTemplateTutorial
–resource-group ARMTemplateTutorial
–template-file azuredeploy.json
–parameters @azuredeploy.parameters.json
Run the deployment and notice what happens. You will receive a deployment error. When the deployment runs, the template is validated for any kind of syntax or schema errors. If it finds any, it notices you, as shown in the screenshot below.

Fix the error by providing a valid domain name label. This domain name label is passed as a parameter value in the dnsLabelPrefix parameter.
The dnsLabelPrefix parameter should look like the following:
"dnsLabelPrefix": {
    "value": "genunique"
}
Try to rerun the deployment. This time, it should start running. But the joy only lasts for so long. The deployment will return another error indicating the adminPassword parameter doesn’t match the required syntax.

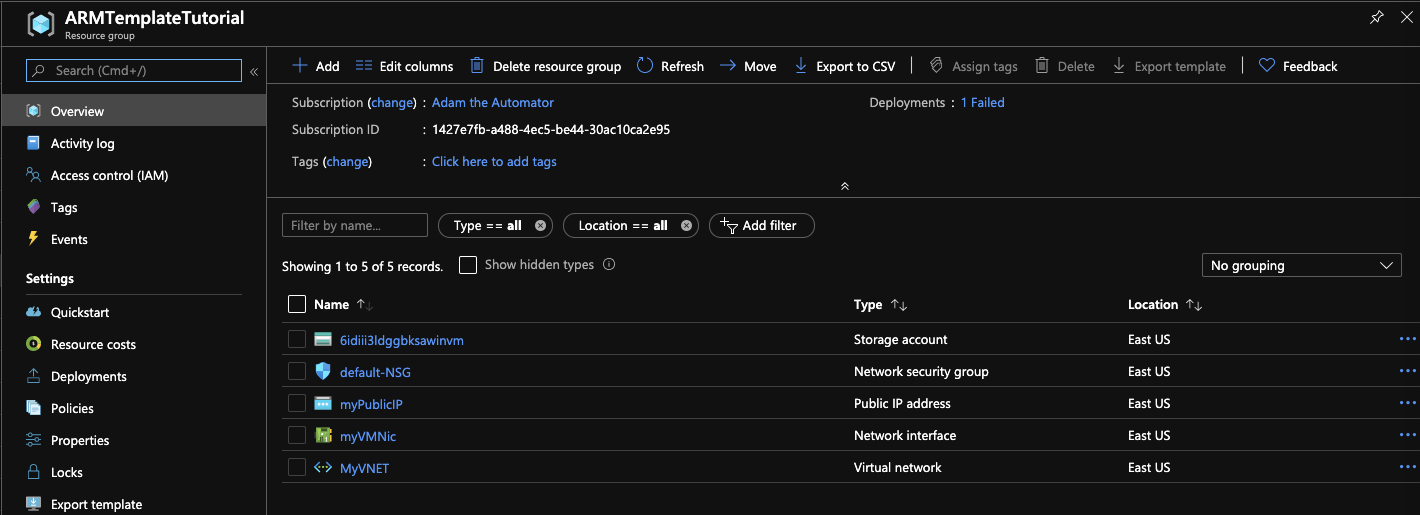
This time, however, you will see that the deployment has already provisioned some infrastructure. In the following screenshot, you can see the resources created in the tutorial’s environment.
Update the adminPassword parameter to P@$$w0rd12 to match the security requirements and try the deployment again. Notice that even though the deployment creates some resources already, a second deployment is not affected. It is smart enough to know to skip them.
This time the deployment will successfully run. Now recheck the Azure portal. You should see the deployment creates all of the resources defined in the ARM template.

Summary
In this tutorial, you learned the basics of how an Azure ARM template is built and how to deploy resources within to Azure. You also learned how to perform basic troubleshooting when template deployment fails validation.
Use the skills learned in this tutorial to guide you on creating and deploying all of your ARM template in your environment!