
In today's tutorial, I'll teach you how to get started with Azure Firewall, Microsoft's cloud-native managed firewall appliance. Call it firewall-as-a-service if you'd like. Let's begin!
Let's say you need to secure network traffic into your company's Azure virtual network. Specifically, your requirements mandate you:
- Centrally control ingress and egress traffic across virtual networks and Azure subscriptions by using policies
- Log and report upon actual or potential security/threat intelligence issues
- Minimize the network security groups (NSG) you must manage in your environment
Now, it's true you can do all of the above by deploying a third-party network virtual appliance into your hub VNet.
Azure Firewall Architecture
Azure Firewall is a Microsoft-managed network virtual appliance that provides stateful packet inspection, high availability, and cloud scalability. The idea here is you don't have to worry about network security group (NSG) filters or pay the extra license costs associated with a third-party network virtual appliance.
Take a look at Figure 1, which illustrates my lab environment:
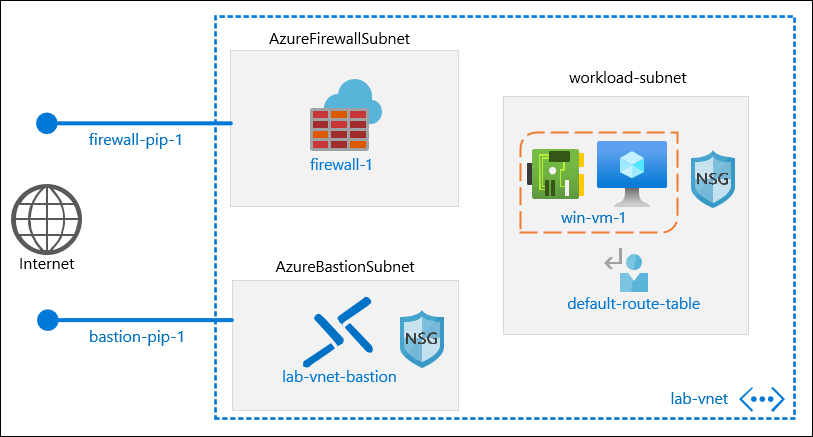
Figure 1. Azure Firewall network topology.
In my environment I'm using Azure Bastion to manage my win-vm-1 virtual machine. You can learn more about Azure Bastion by reading my related blog post, Getting Started with Azure Bastion.
We'll configure Azure Firewall to capture all egress traffic from win-vm-1 by defining a route table with a default route pointing to the Azure Firewall. Finally, we'll configure Azure Firewall policies to allow outbound Internet connections only to the PowerShell Gallery.
Deploy Azure Firewall
I suggest you configure your target virtual network before you deploy the Firewall. Specifically, you need to create a separate subnet for Azure Firewall that:
- is at least /27 in size
- is named AzureFirewallSubnet
You can see my virtual network's subnet topology in Figure 2.
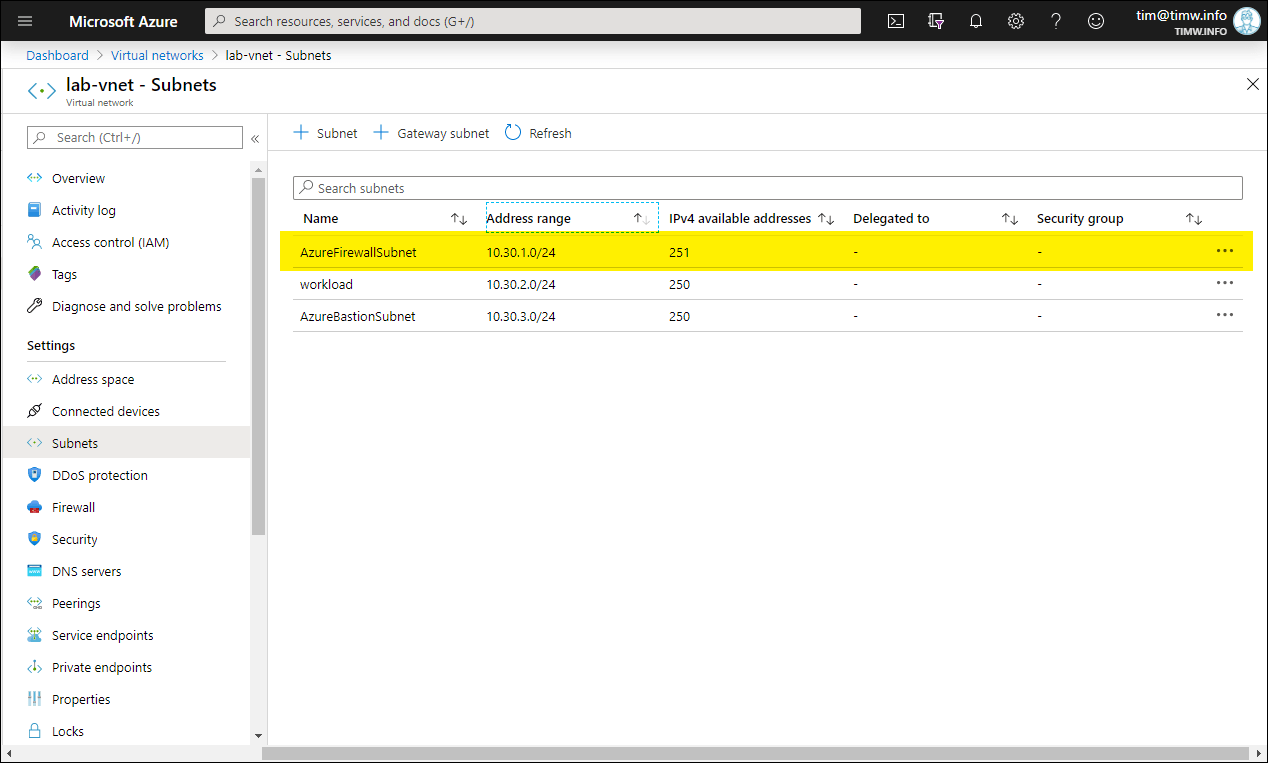
Figure 2. This VNet is prepared for Azure Firewall.
Next, head on over to the Firewall setting and click Click here to add a new firewall. The Create a firewall blade appears, as shown in Figure 3.
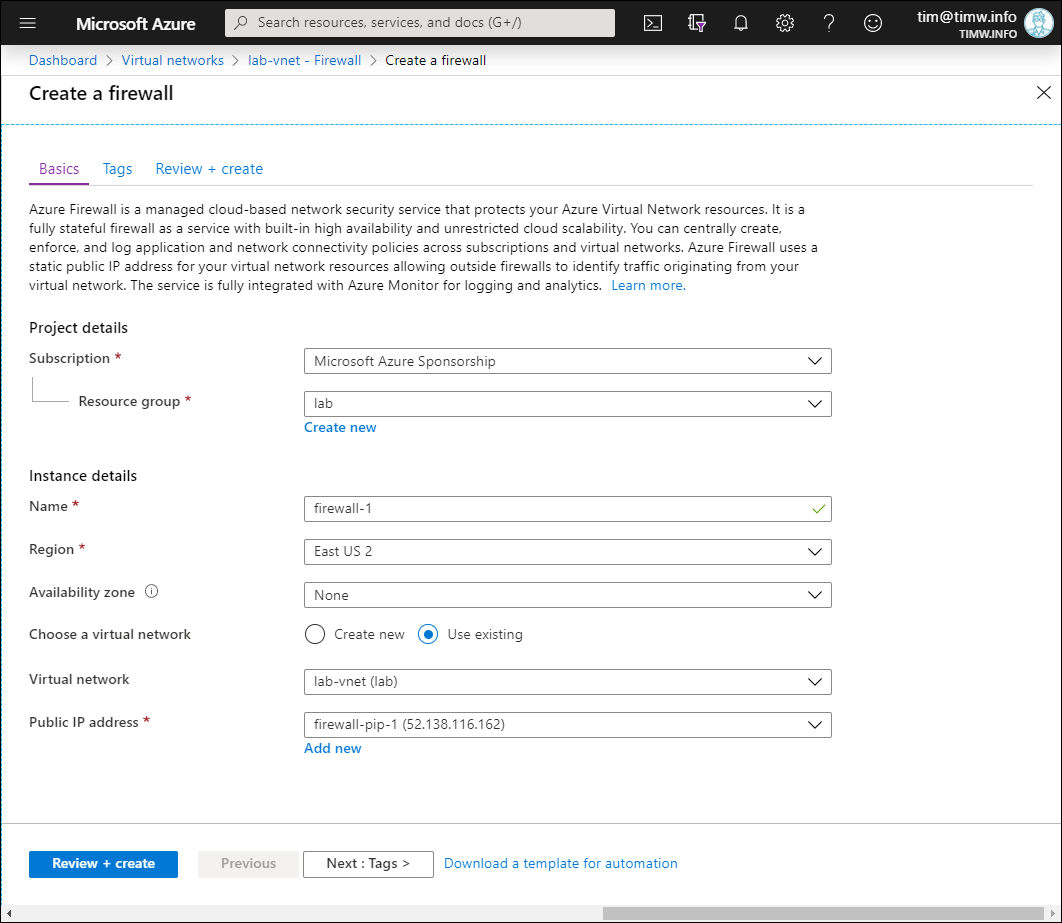
Figure 3. Creating an Azure Firewall.
Make sure to place the firewall on its reserved subnet in your target virtual network. Notice that you can spread Azure Firewall instances across availability zones (Azure datacenters) if your region supports them.
Threat intelligence in Azure Firewall refers to how Azure Firewall responsd to traffic from known malicious IP addresses and Domain Name System (DNS) domains. As you can see in Figure 4, your configuration options here are:
- Off: Disable threat intelligence
- Alert only: The firewall audits and notifies you of high-confidence threat intelligence signal data
- Alert and deny: The firewall proactively blocks network traffic associated with high-confidence alerts
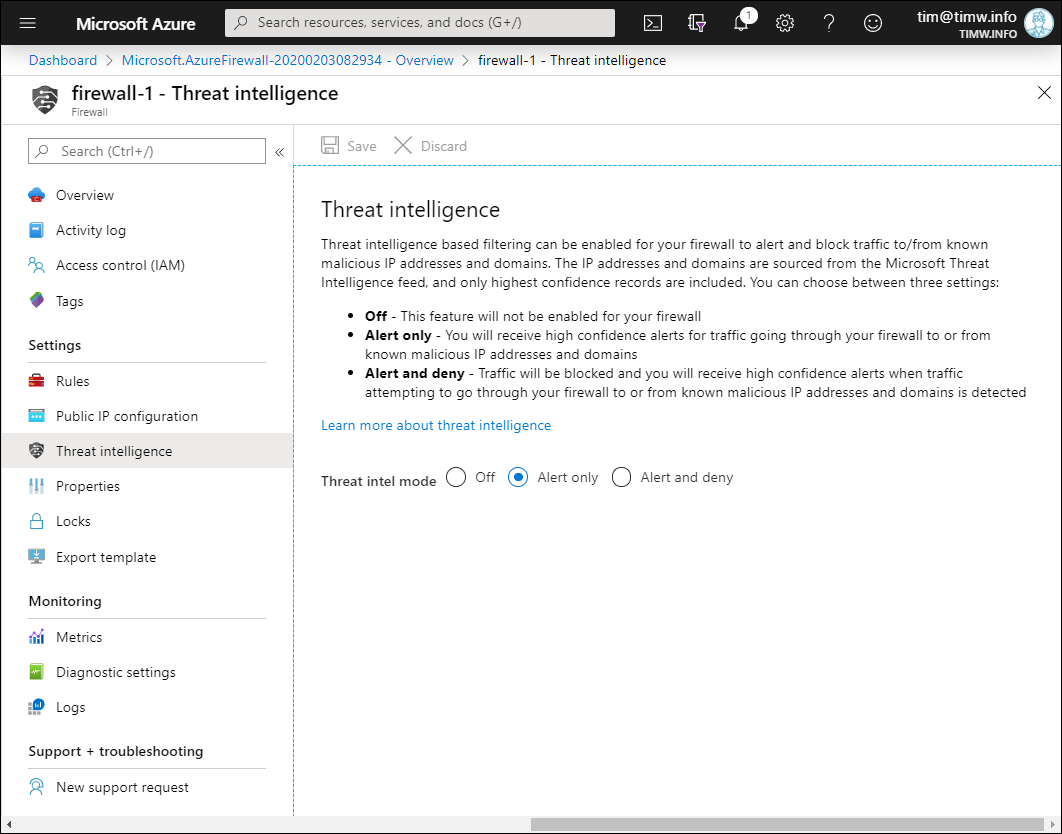
Figure 4. Configuring Azure Firewall threat intelligence.
Define Azure Firewall Rule Collections
Azure Firewall rules are similar to NSG rules inasmuch as they are terminating. That is, the first rule that applies to a given traffic stream is used, and the firewall ignores subsequent rules. If a traffic stream doesn't match a rule, then it is denied by default.
Your rules are organized as collections; three rule collection types are available in Azure Firewall:
- NAT rule collection: Define inbound connectivity rules to particular resources inside your VNet by using Network Address Translation (NAT)
- Network rule collection: Define Allow or Deny traffic rules based on IP addresses and/or service tags. Network rules are applied before application rules
- Application rule collection: Define Allow or Deny rules based on Domain Name System (DNS) names
Let's start by creating an application rule that allows traffic from our workload subnet to the PowerShell Gallery website. On the Rules setting, switch to the Application rule collection tab, and click Add application rule collection.
Use Figure 5 as your guide as you populate the values:
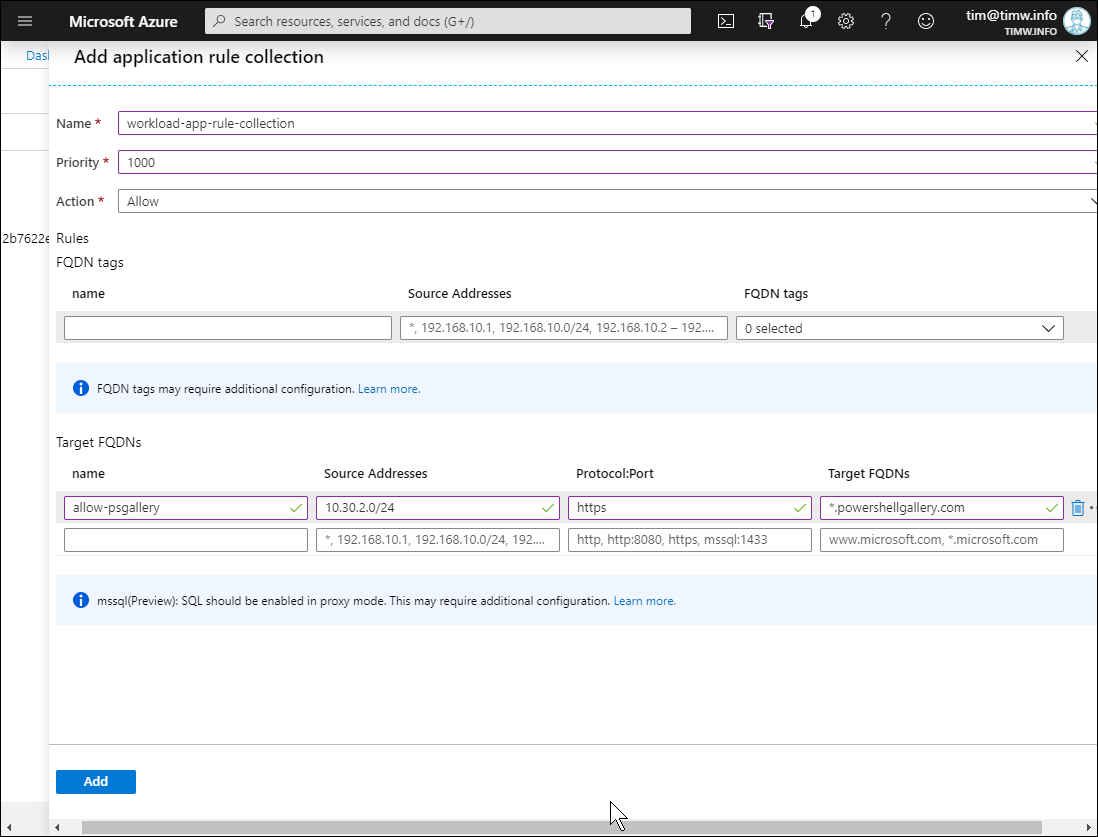
Figure 5. Creating an application rule collection.
- Name: workload-app-rule-collection
- Priority: 1000 (valid values range from 100 to 65000)
- Action: Allow
- Target FQDN rule name: allow-psgallery
- Source Addresses: 10.30.2.0/24 (this is the network ID of our workload subnet)
- Protocol:port: https
- Target FQDNs: *.powershellgallery.com (notice that wildcard characters are allowed)
Next, let's use the same general process to create a network rule collection that allows DNS resolution traffic. In this case, let's imagine we want to use Google's public DNS servers, 8.8.8.8 and 8.8.4.4.
- Name: workload-network-rule-collection
- Priority: 1000
- Action: Allow
- IP Addresses name: allow-dns-goog
- Protocol: UDP, TCP
- Source Addresses: 10.30.2.0/24 (again, this is our workload subnet network ID)
- Destination Addresses: 8.8.8.8,8.8.4.4 (you can input multiple values by separating them with a comma)
- Destination Ports: 53
I show you my configuration in Figure 6.
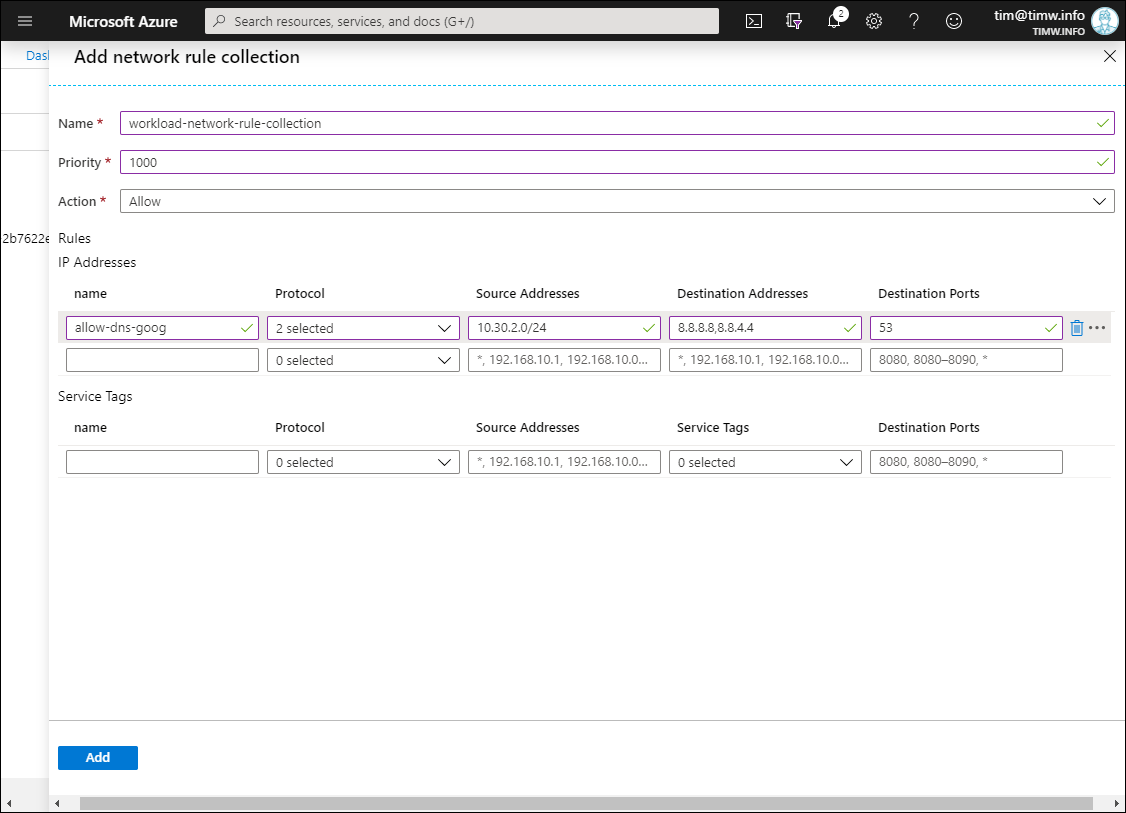
Figure 6. Creating a network rule collection.
While we're at it, we should add Google's DNS server addresses to our virtual network's DNS server list. On the DNS servers setting of your workload VNet, select Custom and add the DNS server IP addresses, as shown in Figure 7.
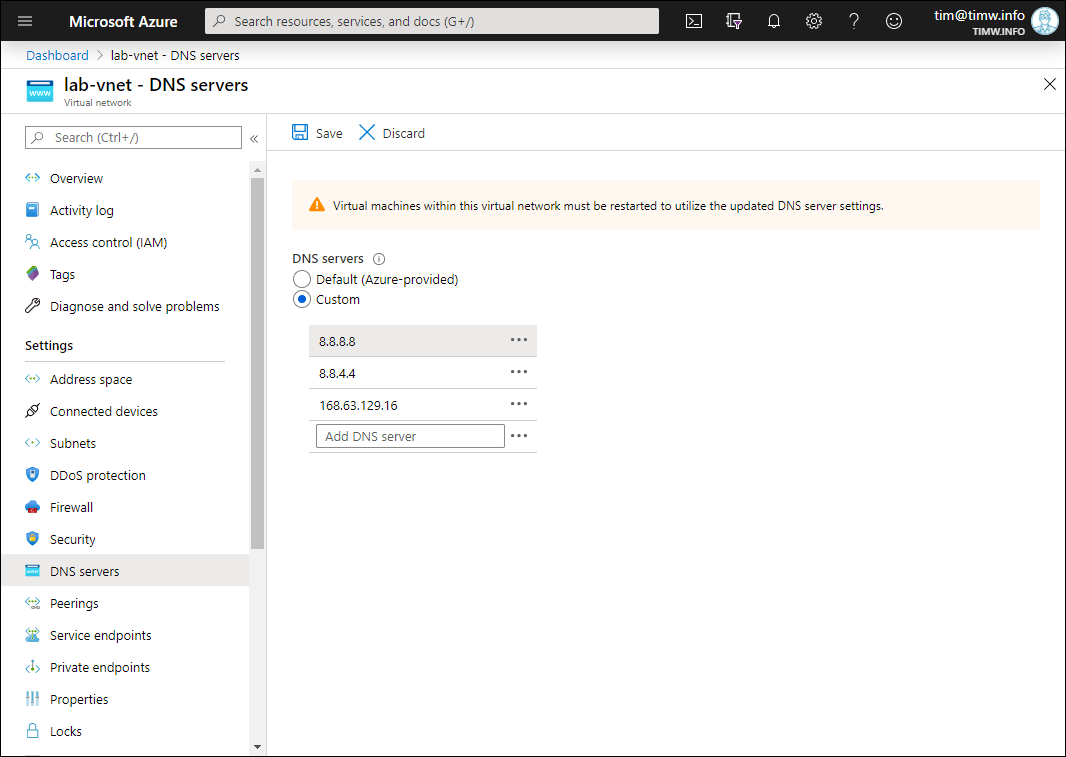
Figure 7. Specifying custom DNS servers for our Azure VNet.
Note that I included 168.63.129.16, the virtual IP address for the Azure DNS service, as a failsafe in case there's a problem with the Google DNS server IP addresses.
Configure a Default Routing Path
Go to your Azure Firewall's Overview page and make a note of the appliance's private IPv4 address. Our final configuration step is creating a route table that force-tunnels all outbound traffic from our workload subnet through Azure Firewall.
Browse to the Route tables blade and click Add to define a new route table; be sure to place the table in the same region as your VNet.
Next, open the table, browse to the Routes setting, and click Add to define a new route. Compare your work with Figure 8.
- Route name: firewall-default-route
- Address prefix: 0.0.0.0/0 (this creates a default route that will be used for all outbound traffic)
- Next hop type: Virtual appliance
- Next hop address: 10.30.1.4 (again, this is the private IP address of your Azure Firewall)
Last, select the Subnets setting for your route table and associate the route table with your workload subnet. All finished! Figure 8 shows my virtual network topology, which you can produce by browsing to your virtual network's Diagram blade:
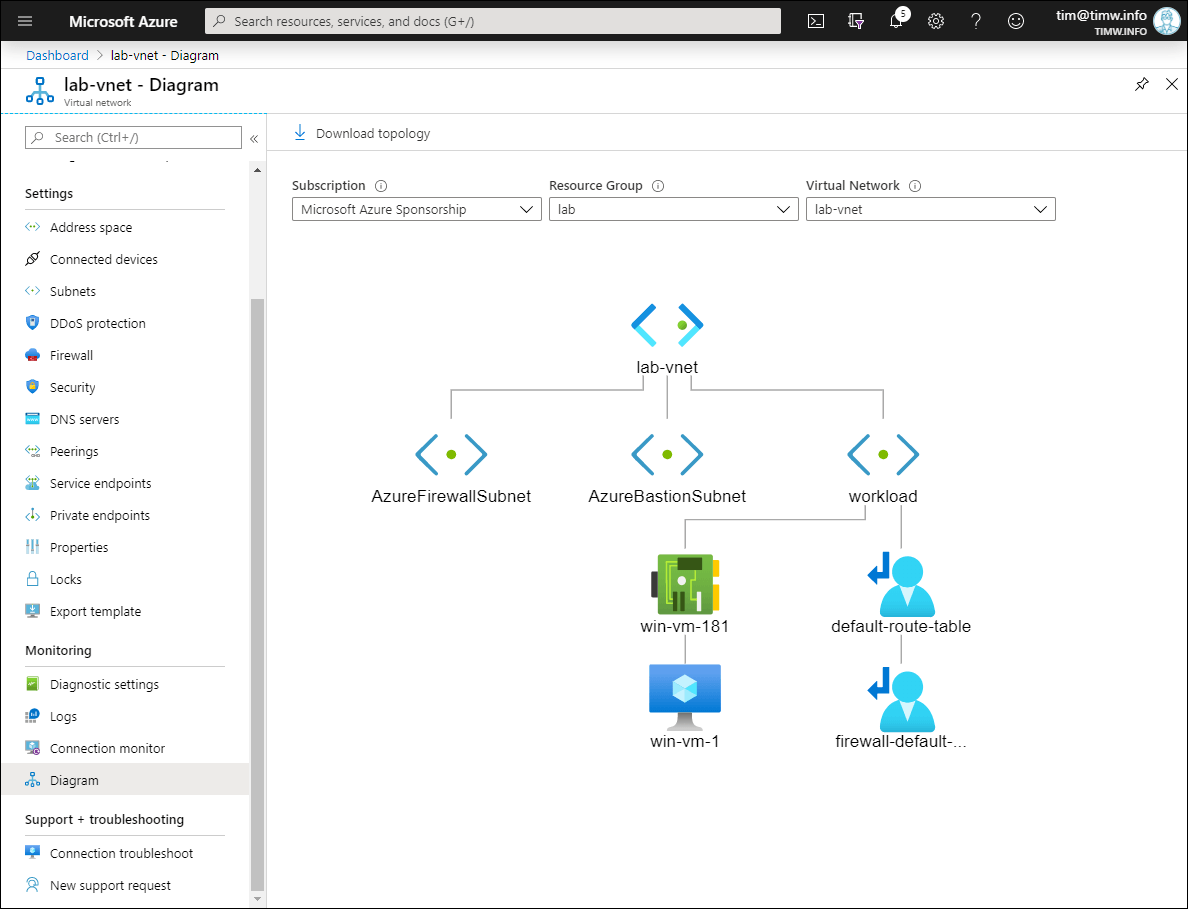
Figure 8: Virtual network topology.
Test Connectivity Through the Firewall
It's time to test connectivity! In the Azure portal browse to your VM's Overview blade and click Connect. Switch to the Bastion tab and log into your VM.
In Figure 9, you see my HTTPS connection to powershellgallery.com succeeded because of our Azure Firewall application rule.
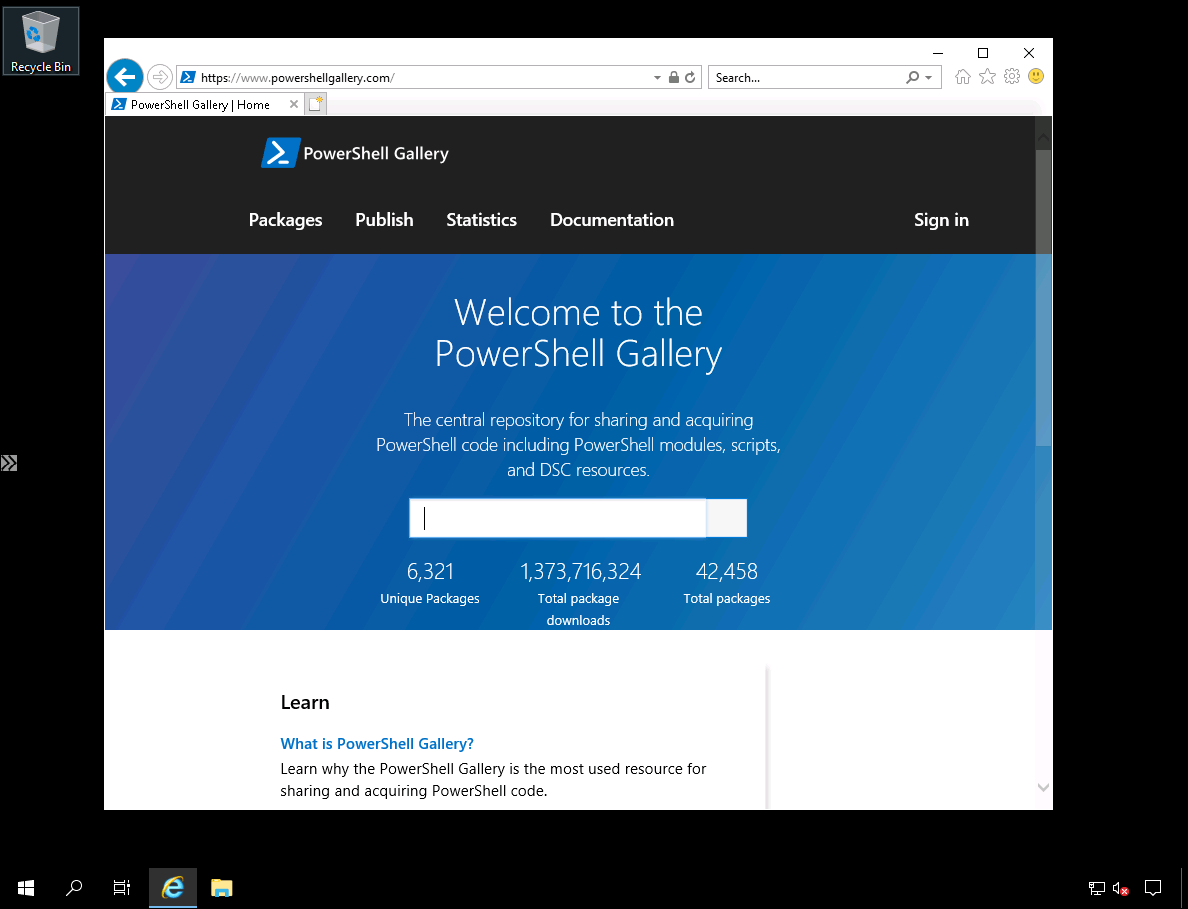
Figure 9. Connection to the PowerShell Gallery is allowed.
In Figure 10. you see my connection to another website failed because Azure Firewall blocks all network traffic that isn't explicitly allowed by a rule.
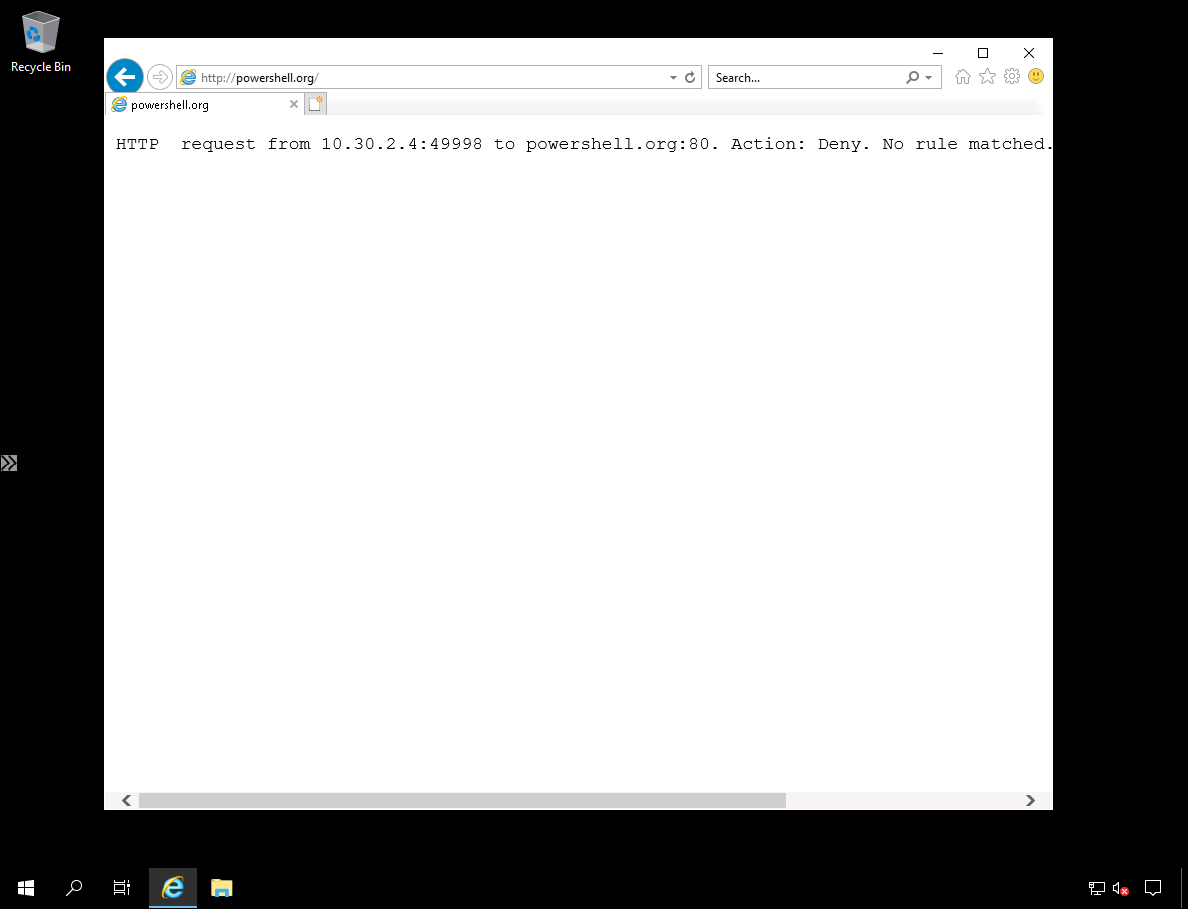
Figure 10. Connection to another website is blocked.
Lastly, open an administrative command prompt and use nslookup to verify we can use only our allowed DNS servers. In Figure 11, you can see that resolving powershellgallery.com against our allowed Google DNS server works just fine. However, the resolution request times out when we shift our server context to a Quad9 public DNS server.
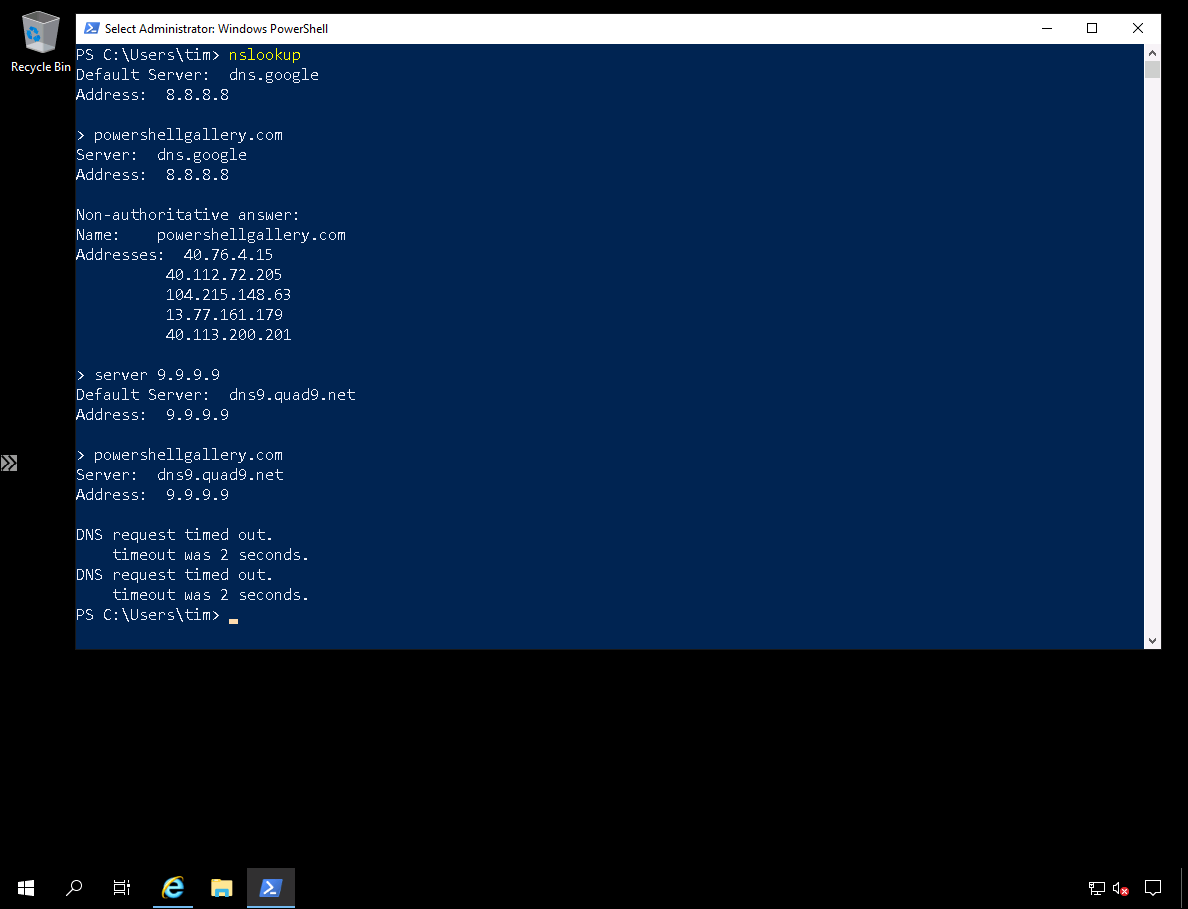
Figure 11. Verifying Azure Firewall network rule enforcement.
Gotchas
As convenient as powerful Azure Firewall is, we should also be aware of its limitations. First, although you can technically use Azure Firewall with peered VNets in other regions, Microsoft advises against do so due to latency issues.
Second, Azure Firewall can be prohibitively expensive to some businesses (approximately $900 USD per month, per appliance). This price gets compounded if you need to deploy multiple Azure Firewall appliances per regional VNet.
Third, as of this writing in February 2020, Azure Firewall does not support chaining an Azure Firewall to another network virtual appliance; this is a process known in Azure as forced tunneling. Azure Firewall is required to have a direct Internet connection at all times.
For Further Learning
There you have it--I hope you're clearer as to what Azure Firewall is and the basics of its deployment and configuration. As usual, I will leave you with some hand-selected web resources to help you extend your learning.