
Adversaries can utilize MITM attacks to steal credentials, even when they are protected by SSL.
An SSH tunnel can be utilized as an extra layer of protection in between the client and server to protect these credentials from theft.
The first step in the process is to configure an SSH tunnel on your windows web server. In this case, we are running an Apache web server on Windows 2012. Windows 2012 does not come with a native SSH server. As such, a third party SSH server software must be installed on the server in support tunneling. In this case, we have chosen OpenSSH.
Setting Up OpenSSH on the Windows Server
The first step in setting up a tunnel is to create a dedicated user account to be used for the SSH connection. In this case, we will create a new user, tunnel, and add it to the administrators group.
Net user tunnel password /add

Net localgroup administrators tunnel /add

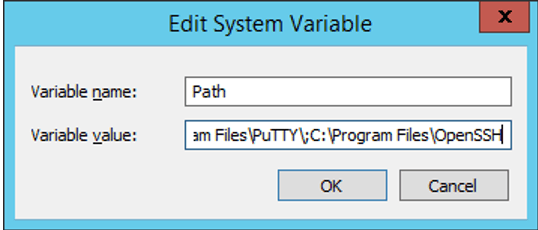
Next, we need to install OpenSSH. To install OpenSSH, first copy the entire contents of the OpenSSH directory in to the following folder: C:\Program Files\OpenSSH. Add the folder C:\Program Files\OpenSSH to the windows PATH environment variable as shown below.
Once the files are copied to the installation directory, open PowerShell as an administrator and browse to the C:\Program Files\OpenSSH directory. Run ./install-sshd.ps1. Start the OpenSSH service with the command net start sshd.
Runas /user:tunnel powershell
Type the command ./ssh-keygen.exe to generate all keys.
Finally, you will need to modify the sshd_conf file slightly. Go to C:\ProgramData\ssh\ . Open sshd_conf with notepad.exe. Comment out the final two lines as shown below.
#Match Group administrators

#AuthorizedKeysFile __PROGRAMDATA__/ssh/administrators_authorized_keys
Uncomment the following line:
PasswordAuthentication yes
Once all the changes have been made, restart the SSH service with the commands below.
Net stop sshd

Net start sshd
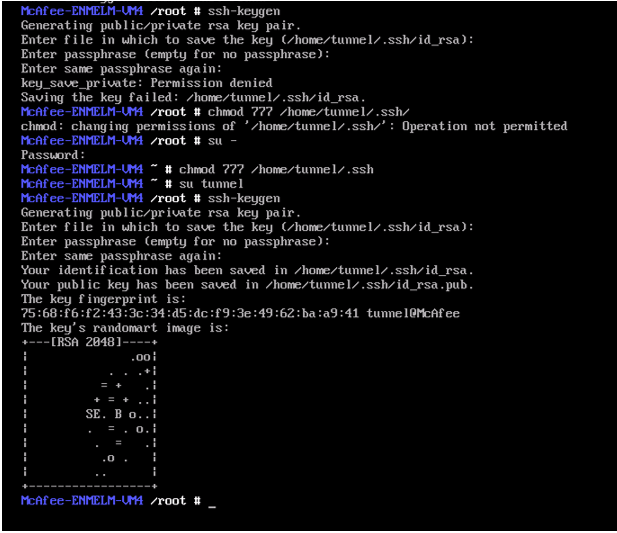
Another file named id_rsa.pub will be created in the same directory. This file holds the public key. Use the putty pscp.exe to SCP the id_rsa.pub file to the OpenSSH server.
On the OpenSSH server, copy the id_rsa.pub file to the C:\Users\tunnel\.ssh\authorized_keys file.
Finally, change the C:\ProgramData\ssh\sshd_conf file to prohibit login via username and password. This will force you to use the key to login.
PasswordAuthentication no
Try your SSH again.
ssh tunnel@ip
This time it should not prompt you for a password. If your keys don’t match, you can use the following command to get the sha256 hash value.
ssh-keygen –l –f .ssh/authorized_keys
Set Up Port Forwarding
The next step is to test port forwarding for the tunnel. In this case, we will be forwarding traffic over port 8007 through the tunnel. Run the following command. Replace ip with the IP address of the openSSH server. The -4 must be added to restrict the command to only bind to the IPv4 address.
ssh -4 –N -f user@ip -L 8007:ip:8007
Make the Tunnel Automatically Start at Reboot
The final step will be to make the tunnel persistent. We will create a script to be run at boot.
vim /home/tunnel/check_ssh_tunnel.sh
The following script should be created.
createTunnel() {

   #sleep for 60 seconds to allow the networking stack to start before executing at reboot

    sleep 60


   #run the port forwarding command as user tunnel


    su tunnel –c ‘/usr/bin/ssh -4 -f -N [email protected] –L 8007:192.168.31.5:8007’


   #check if the tunnel is up and echo Tunnel status

    if [[ $? -eq 0 ]]; then

        echo Tunnel to hostb created successfully

    else

        echo An error occurred creating a tunnel to hostb RC was $?

    fi

}

CreateTunnel
The last step is to add this to crontab so that it will run at reboot. To edit crontab, run the following command.
crontab –e
Add the following line and save the file.
@reboot /home/tunnel/create_ssh_tunnel.sh
Finally, reboot your machine. To ensure that the tunnel is running, run the following command.
Ps –aux | grep ssh
You should see the tunneled connection. That’s it! Good luck and happy tunneling.