When an Exchange organization is made available for external and internal access, the proper SSL certificate must be installed on the server.
This is to ensure that the URL endpoints such as Outlook Web App and ActiveSync are properly identified (trusted certificate) and securely accessed (encrypted).
It is also recommended and almost unavoidable to assign more than one host name to the Exchange web services. There could be a minimum of three host names assigned to Exchange for SMTP, OWA and Auto Discover.
Having multiple host names for Exchange would require a Subject Alternating Name (SAN) certificate to be installed. SAN certificates are more expensive when compared with a wildcard or single-name certificate.
Thanks to the Let’s Encrypt Certificate Authority, there’s a free alternative to getting SSL SAN certificates. Yes, you read it right, it is FREE! And in this article, you will learn how to get, install and schedule to automatically renew SAN SSL certificates for Exchange Server 2019.
Requirements
This article assumes that you have the following prerequisites in place.
- Microsoft Exchange Server 2019
- You should have an Exchange server already set up and that the internal and external URLs already configured. (see Configure mail flow and client access on Exchange servers)
- Internal and external DNS records for the hosts to be included in the SAN certificate. Specific to this article, three host names will be used.
- psh-lab.gq - main certificate name
- psh-lab.gq
- psh-lab.gq
- An ACME client that is supported by the Let’s Encrypt CA. Specific to this article, the win-acme client will be used because it is easy to use and have lots of documentation. The latest version as of this writing is 2.1.2.636.
If you need to set up a test environment, you can request a trial Azure subscription to create virtual machines to install Exchange Server 2019 and a public DNS zone to host your domain(s). You can also request for a free domain from freenom.org.
Exchange Server without a Trusted SSL Certificate
Let’s first take a look at what the Outlook Web App looks like before installing a trusted SSL certificate.
The screenshot below shows that there’s a certificate error for the site https://webmail.psh-lab.org. The warning shows that there is a problem with the website’s security certificate and that it is unsafe.
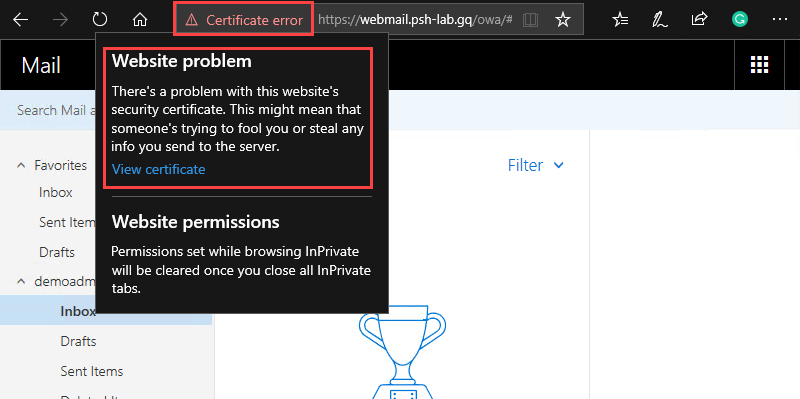
Outlook Web App Certificate Error
Getting a New Let’s Encrypt SSL SAN Certificate
There are two ways to get a certificate from Let’s Encrypt CA using the win-acme client. The interactive menu-driven method and the command-line/unattended method. You’ll learn how to use both methods next.
In the next sections, it is assumed that win-acme client is installed in *c:directory on the Exchange server.
Using the Interactive Menu
The interactive menu is the recommended method in requesting SSL certificates especially if it is the first time. This is because this method gives hints and descriptions along the way that can familiarize you in what the tool is doing under the hood.
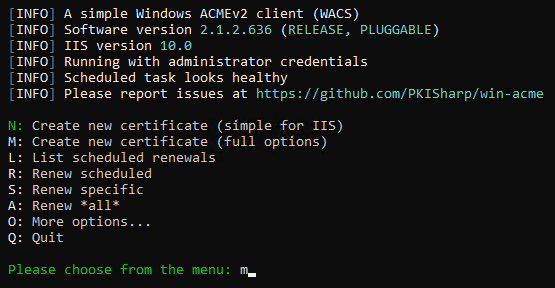
To start, open an elevated command prompt and change the working directory to where the win-acme client is installed, run wacs.exe. You will be presented with an interactive menu.
There is no “simple” menu for setting up the certificate for Exchange, so at this point, enter M to create a new certificate with full options.
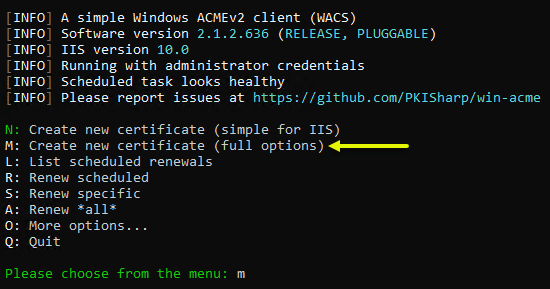
Choose to create a new certificate with full options.
Choose to create a new certificate will full options.
Next, you will be asked to select how the list of host names will be included in the certificate to be requested. Enter 2 to choose the option for manual input.

Select the option to manually input the host names
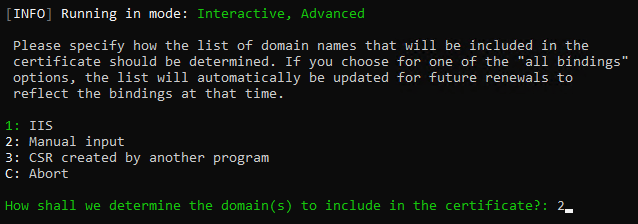
Select to manually input the host names
You are prompted for the list of host names. Enter multiple host names separated with a comma. In this example, the host names used are mail.psh-lab.gq,webmail.psh-lab.gq,autodiscover.psh-lab.gq
The first host name in the order will be chosen as the main certificate name by default.

Specify the host names to include in the SAN certificate
The next prompt shows you the suggested friendly name for the certificate (this is not the same as the certificate name), press Enter to accept the default.

Accept the default friendly name
The list of available methods to verify the ownership of the domains you added for the SAN certificate. Enter 2 to choose the option to use the [http-01] recommended verification method.
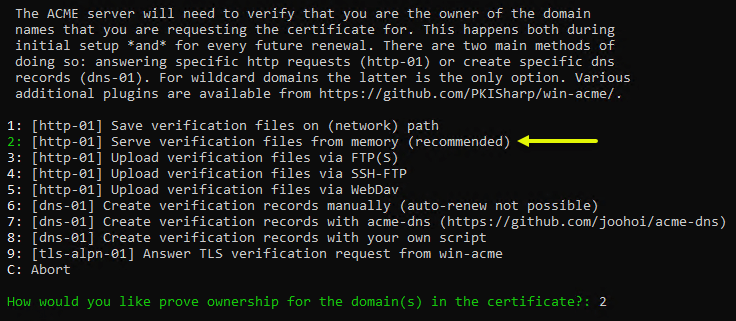
Choose the recommended ownership verification method
Choose the type of encryption key to be used for the certificate signing request. The default option is RSA key and it is also recommended. Enter 2 to choose RSA key.
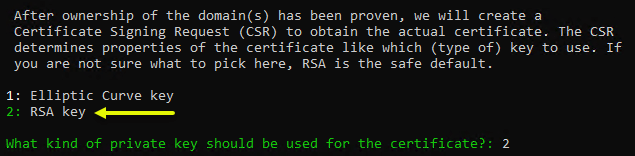
Select RSA key for the certificate signing request
There is more that one way to store the requested certificate. But, in this example, the Windows Certificate Store will be selected. Enter 3 and press Enter.
When asked if you want to add another way to store the certificate, enter 3 again to skip and press Enter.
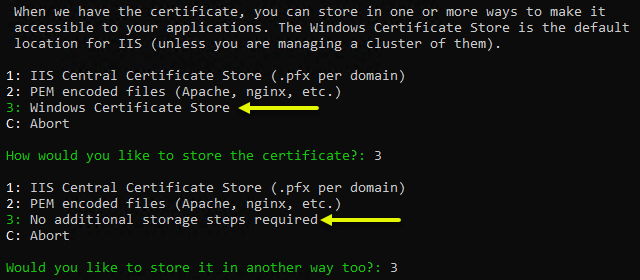
Choose the Windows Certificate Store only
Next, you will be asked to choose one or more actions to perform after the certificate is installed in the Windows Certificate Store. Choose options 1 to create or update the HTTPS bindings and 1 to select the Default Web Site.
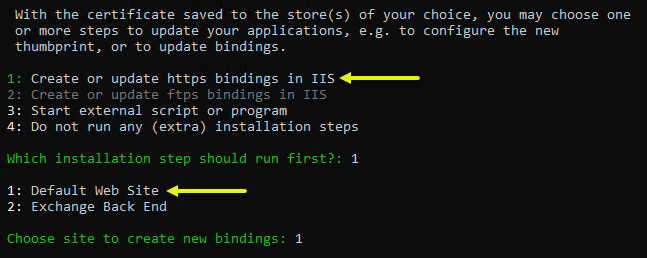
Select options to update the https IIS binding for the Default Web Site
The Exchange Server Front-End sites are hosted in the Default Web Site in IIS.
When asked to add another installation step, choose 2to start an external script or program. Then, when prompted for the path of the script, enter this path ./Scripts/ImportExchange.ps1.
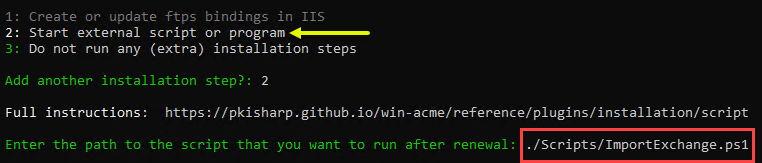
Select to start a script and provide the path to the script
The script ImportExchange.ps1 is included with the installation of the win-acme client and is located in the subfolder Scripts. The function of this script is to apply the certificate to the Exchange Services like OWA, SMTP, and IMAP.
Next, you will be asked to enter the parameters for the specified script, enter this line below. In this example, the certificate will be applied to IIS, SMTP, and IMAP.
'{CertThumbprint}' 'IIS,SMTP,IMAP' 1 '{CacheFile}' '{CachePassword}' '{CertFriendlyName}'You only need to change the second parameter value if you want to add or remove which services will the certificate be applied to. Leave all the other parameter values as default. See the example below for reference.

Enter the script parameter values
The win-acme client will proceed to perform the following tasks:
- Submit and validate the request
- Acquire and install the certificate in the certificate store. The certificate is installed to the *Local Machinecertificate store by default.
- Add the HTTPS binding of the site to use the new certificate.
- Create a new scheduled task in the Windows Task Scheduler for the automatic renewal of the certificate.
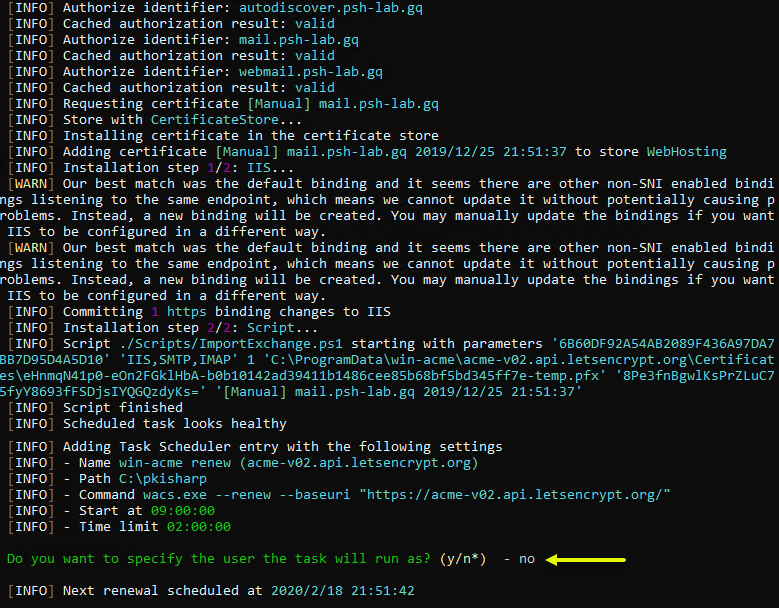
win-acme requests and installs the SSL certificate
SSL certificates issued by the Let’s Encrypt CA is only valid for 90 days from the date of issuance. By default, the win-acme client only renews certificates that are older than 55 days.
Using the Command Line
You’ve seen how to get and install the SAN certificate using the interactive menu in the previous section. Now, you will learn the same but using the command-line instead.
To request for the SAN certificate using the command line option, copy the code below and paste it in the elevated CMD prompt. The working directory must be where the folder where the win-acme client is installed. In this example, the win-acme client is installed in c:.
Do not forget to change the host names specified in the --host parameter. The command below will perform the same exact steps as with the interactive method but without any confirmation.
wacs.exe --target manual --host mail.psh-lab.gq,webmail.psh-lab.gq,autodiscover.psh-lab.gq --certificatestore My --acl-fullcontrol "network service,administrators" --installation iis,script --installationsiteid 1 --script "./Scripts/ImportExchange.ps1" --scriptparameters "'{CertThumbprint}' 'IIS,SMTP,IMAP' 1 '{CacheFile}' '{CachePassword}' '{CertFriendlyName}'"To learn more about the command-line options, please visit Win-ACME Command line arguments reference page.
Testing the Exchange Server SAN SSL Certificate
There are several ways to test the newly installed SAN SSL certificate in the Exchange Server. In this section, you’ll learn how to test and confirm the certificate in a few different ways.
Using Online SSL Checker Tools
There are many online tools available for checking SSL certificates, one of which is the DigiCert® SSL Installation Diagnostics Tool.
Go to the DigiCert® SSL Installation Diagnostics Tool website and enter the host name from the SAN certificate. The screenshot below shows the result of the SSL test for mail.psh-lab.gq.
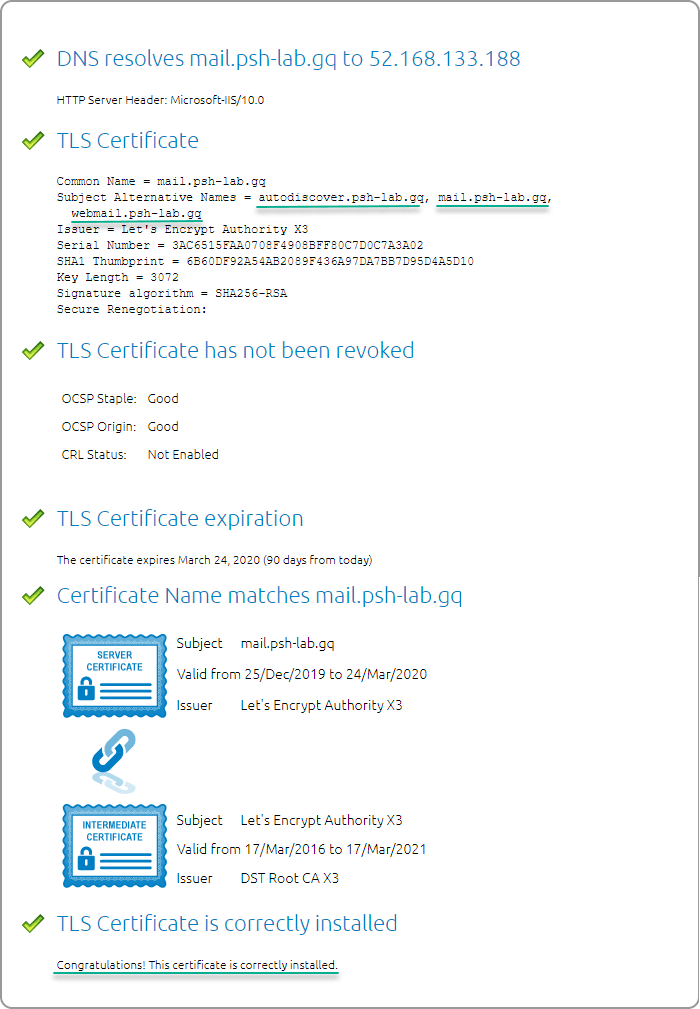
SSL certificate is valid and properly installed
Using the Microsoft Remote Connectivity Analyzer
When you visit the Microsoft Remote Connectivity Analyzer page, you will learn that there is a lot of tests available for Exchange Server. In this example, the Outlook Connectivity test will be used.
The example below shows that the Outlook Connectivity Test result is successful with warnings. Upon further inspection, the warning was only about making sure that the “Update Root Certificates” option in Windows Update is selected.
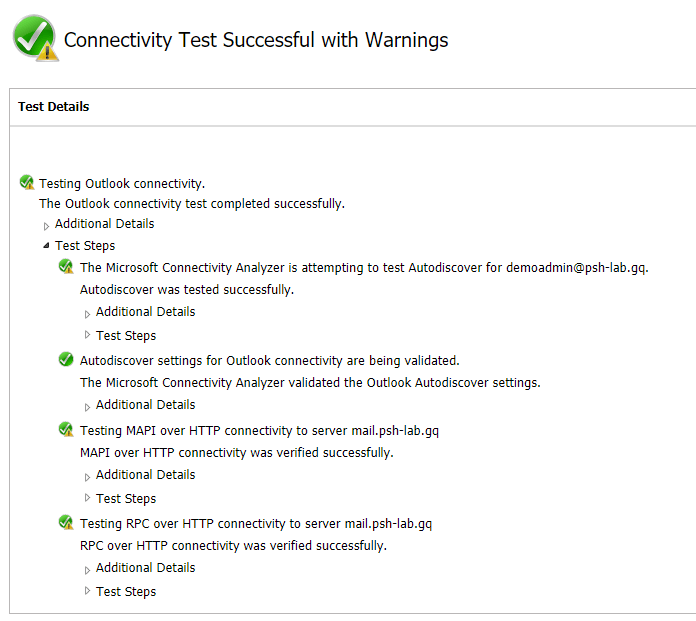
Connectivity Test is successful
Using the Outlook Auto Discover
To test, create a new account in Outlook. When you enter the email address of the account, Outlook should be able to automatically discover the Exchange server settings and set up the Outlook profile on the computer.
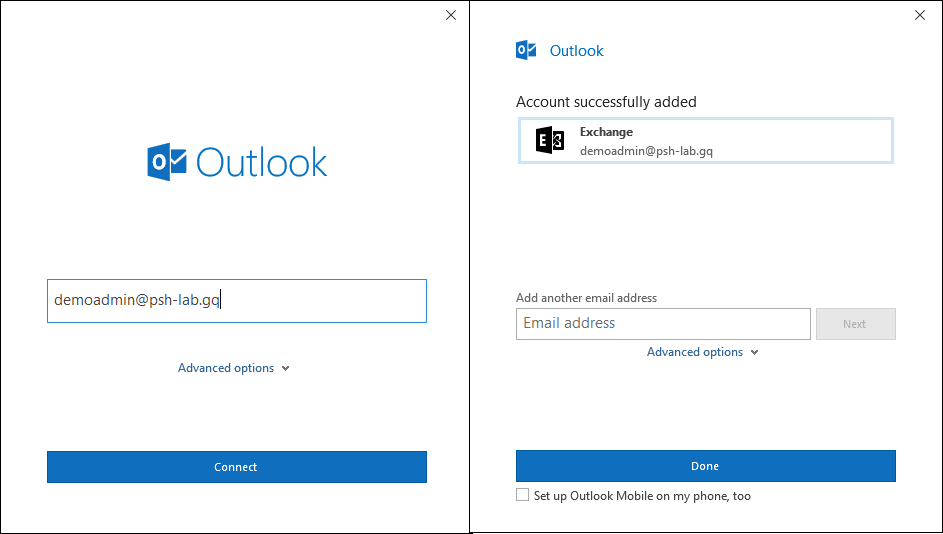
Outlook Auto Discover
Browsing the Outlook Web App
At the beginning of this article, you’ve seen how the Outlook Web App site shows the certificate warning before the SSL certificate was installed. After installing the SAN certificate, navigating to the URL https://webmail.psh-lab.gq no longer shows the certificate error. See the example screenshot below.
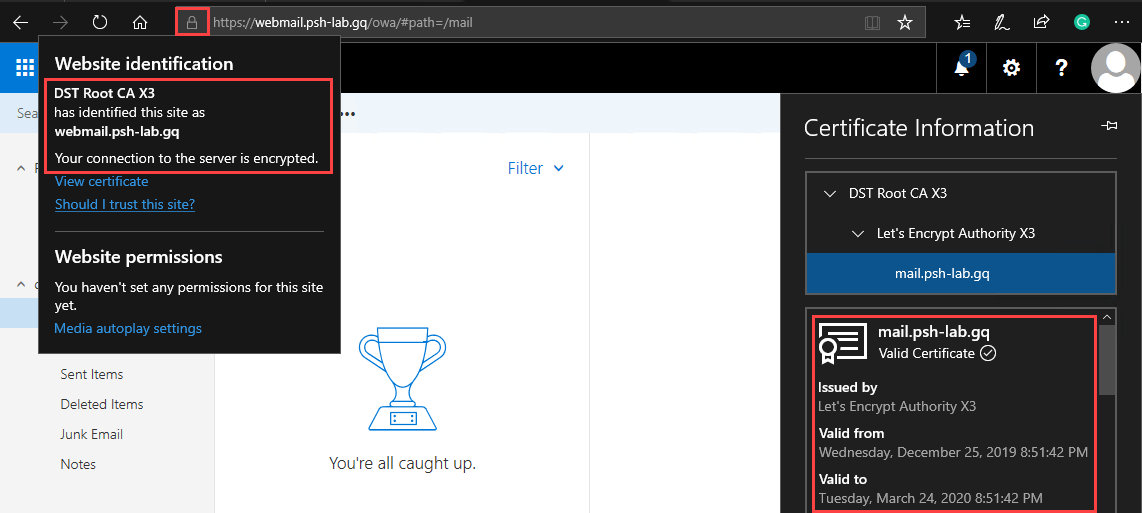
Outlook Web App certificate is valid and trusted
Summary
In this article, you’ve learned how to use the win-acme client to request, install and schedule renewals of Let’s Encrypt SSL SAN certificates for an Exchange Server 2019. You’ve learned the two options of doing so which are the interactive menu and the command line method.
Additionally, you’ve also learned several different ways to test and confirm that the SAN certificate is installed correctly and is used by the Exchange services. The steps provided in this article only covered the procedure for installing the certificate to a single Exchange 2019 server.
If you have multiple Exchange server deployments, you will come up with a process to export the certificate and import it to the other Exchange servers in your organization.
Thank you for reading!