
In this article, we provide three tips to help you become more efficient with PowerShell commands. We will specifically cover how to streamline your efforts in searching for text inside of strings, transforming MSQL data into both XML and JSON, and building XML schemas.
PowerShell has proven very beneficial for system administrators who support Windows systems as it can automate many routine tasks. For developers, PowerShell offers an alternative to other scripting languages and comes standard on most Windows machines. You don’t need to install PowerShell or do any extra set up to get it working.
Like any other coding tool, PowerShell also comes with little quirks that you need to work around.
Tip #1 - Using Select-String—the PowerShell Grep for Windows
When writing PowerShell scripts and the need arises to search for text inside of a single string or an entire text file, where do you turn? If you've used Linux, you're probably familiar with the popular grep utility, which allows you to search text using different options.
In Windows, this utility doesn't exist. But you’re not out of luck—you can turn to the Select-String cmdlet. For example, if you've got a big string of code containing various employee names and addresses that aren’t written in any well-known structure, you're forced to pull out all of the employee names via text parsing.

How would you make that happen? First, let's start with the example string:
||Adam Bertram|| 2122 Acme Ct, Atlantic City, NJ
  --||Joe Jonesy||-- 555 Lone St, Las Vegas, NV
  ==|Suzie Shoemaker|== 6783 Main St, Los Angelas, CA
Assuming this string is assigned to a variable called $employees, you can grab just the employee names from this string by attempting to get the syntax right on Select-String. To do that, statically search for one of the employee names using the pattern parameter as shown below.
PS> $employees | Select-String -Pattern 'Adam Bertram'

  ||Adam Bertram|| 2122 Acme Ct, Atlantic City, NJ
  --||Joe Jonesy||-- 555 Lone St, Las Vegas, NV
  ==|Suzie Shoemaker|== 6783 Main St, Los Angelas, CA
Notice that Select-String did return something so that it found a match. Otherwise, it would have returned nothing. But it returned the entire string. The reason why was that Select-String parsed the entire string as one.
So you first need to figure out how to separate out each of these lines into different strings. Since each employee reference is on a new line, you can break them up by splitting this string on the new-line character `n as shown below:
PS> $employees = $employees -split "`n"

  PS> $employees | Select-String -Pattern 'Adam Bertram'

  ||Adam Bertram|| 2122 Acme Ct, Atlantic City, NJ
Notice it's just returning a single line. That means you’re getting close!
Next, figure out how to return all employee lines. To do so, you will need to determine a familiar pattern that each one shows. It looks like each employee name is surrounded by a | character so we can use this pattern in the pattern parameter on Select-String.
Since each employee's first and last name is also separated by a space, we can account for this as well.
The string below now represents this pattern as a regular expression, which Select-String gladly accepts in the Pattern parameter:
PS> $employees | Select-String -Pattern '\|\w+ \w+\|'

  ||Adam Bertram|| 2122 Acme Ct, Atlantic City, NJ

  --||Joe Jonesy||-- 555 Lone St, Las Vegas, NV

  ==|Suzie Shoemaker|== 6783 Main St, Los Angelas, CA
Notice that Select-String has now returned each line again using the regular expression.
For the next step, parse out each of the employee names themselves. At this time, you don't need the address for each. To do this, reference the matches property returned on each matched object that Select-String returns:
PS> $employees | Select-String -Pattern '\|\w+ \w+\|' | foreach {$_.Matches}

  Groups   : {0}

  Success  : True

  Name     : 0

  Captures : {0}

  Index    : 1

  Length   : 14

  Value    : |Adam Bertram|

  Groups   : {0}

  Success  : True

  Name     : 0

  Captures : {0}

  Index    : 3

  Length   : 12

  Value    : |Joe Jonesy|

  Groups   : {0}

  Success  : True

  Name     : 0

  Captures : {0}

  Index    : 2

  Length   : 17

  Value    : |Suzie Shoemaker|
You’re getting closer! The value property now contains the employee names you need, but it's still got those pipe characters surrounding them. This is because the regex match was the employee name including the pipe characters.
You still need to include the pipe characters in the search, but we don't want to return them as matches. One way to do this is to use regular expression (regex) groups. Regex groups are represented by parentheses surrounding the match you'd like to return.
In this case, you would enclose the regex string representing just the employee first and last name, and then try again:
PS> $employees | Select-String -Pattern '\|(\w+ \w+)\|' | foreach {$_.Matches}

  Groups   : {0, 1}

  Success  : True

  Name     : 0

  Captures : {0}

  Index    : 1

  Length   : 14

  Value    : |Adam Bertram|


  Groups   : {0, 1}

  Success  : True

  Name     : 0

  Captures : {0}

  Index    : 3

  Length   : 12

  Value    : |Joe Jonesy|


  Groups   : {0, 1}

  Success  : True

  Name     : 0

  Captures : {0}

  Index    : 2

  Length   : 17

  Value    : |Suzie Shoemaker|
It still shows the value with the pipe characters, but look at the group’s property. Rather than just being a 0, they now show 0,1. This means Select-String has captured a group.
To view this group, add the reference in the foreach loop again. Since each group’s property is an array, you can reference the 1 element by surrounding it with brackets and then referencing the value property:
PS> $employees | Select-String -Pattern '\|(\w+ \w+)\|' | foreach {$_.Matches.Groups[1].Value}

  Adam Bertram

  Joe Jonesy

  Suzie Shoemaker
You can now see that we’ve pulled out each of the employee names from the string.
Tip #2 - Using PowerShell to Transform MySQL Data Into XML & JSON
PowerShell can interact with just about every data source you can imagine. Due to Windows PowerShell’s reliance on the Windows .NET Framework, if the version of the PowerShell language doesn’t support working with a particular data source, you always have the ability to call .NET objects directly. This flexibility makes it the perfect candidate for building scripts that transform data from one format to another.
We will show you two examples of using Windows PowerShell scripting to transform data from different data sources—by pulling data from a MySQL database on a Windows MySQL server and transforming it into two different types of structured flat files: XML and JSON. For both examples let’s assume you already have a Windows MySQL server and a database with at least one table in it you’d like to retrieve.
Let’s also assume that you don’t manage this server from the server itself but rather from client software like MySQL Workbench, which allows you to connect to your MySQL instance remotely. You can then use a PowerShell command to transform MSQL data into both XML and JSON. Here’s how…
MySQL to XML
If you download ConvertMySqlRow-ToXml.ps1, you should have a PowerShell script at C:\ConvertMySqlRow-ToXml.ps1. This script contains a function with the same name.
In order to use this function, you need to dot-source the function into your session. This simply means loading the function inside of the file in your session so that you can then use it just like other PowerShell cmdlets or functions. To do this, use a dot followed by the path of the PowerShell script:
. C:\ConvertMySqlRow-ToXml.ps1
Everything is in place now where you can execute the transformation. Query all the rows in the MySQL table called Users in the SynergyLogistics database using the Connect-MySQLServer and the Invoke-MySqlQuery function. You can then pipe that output to the input of the ConvertMySqlRow-ToXml function, which will ultimately leave you with this single XML file:
Invoke-MySqlQuery -Query ‘select * from users’ | ConvertMySqlRow-ToXml -ObjectType User -Path C:\users.xml
Notice the parameters on the ConvertMySqlRow-ToXml function: ObjectType and Path. Due to the XML tree, each MySQL row data needs to have a parent. The ObjectType parameter signifies the “type” of object that each row represents.
In this example, the Users table consisted of peoples’ first name, last name, address, city, and other information. These are all users, thus the ObjectType is used. Finally, the path parameter is where you’d like the XML file created.
If all goes well, you will end up with a file at C:\Users.xml that looks something like this:
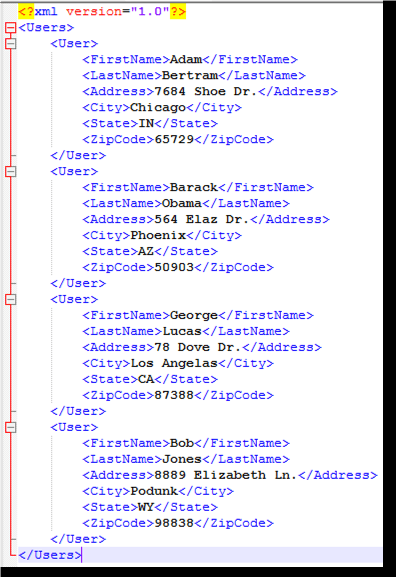
Example of XML output from a MySQL table
MySQL to JSON
After converting MySQL data into XML format, you just have to repeat the conversion process for the JSON script. Again, dot-source in the script that you downloaded previously:
. C:\ConvertMySqlRow-ToJson.ps1
Then, use the Invoke-MySqlQuery cmdlet to pull the MySQL table rows again, and this time pass that output to the ConvertMySqlRow-ToJson function, specifying the path to where you would like the resulting JSON file created:
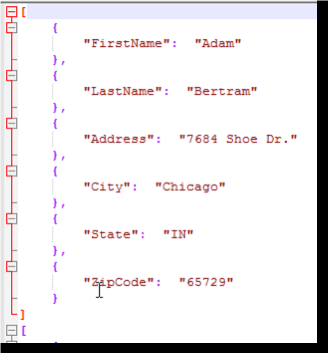
Invoke-MySqlQuery -Query ‘select * from users’ | ConvertMySqlRow-ToJson -Path C:\users. json
If all went well, you should now have a JSON file at C:\Users.json that looks like image below. This image just shows the first MySQL row data, but all other rows will be in this file as well.
For more help on transforming data with PowerShell, download our free white paper.
Tip #3 - How to Build XML Schemas
Since an XML schema is simply a text file, there are a number of different ways the schemas can be created. They can be written by hand in a text editor, built by various online utilities, or they can be done programmatically using code. For this example, we will focus on building an XSD (XML Schema Definition) and validating an XML file in code—more specifically with Windows PowerShell.
Although not natively supported, a PowerShell server has the ability to use its underlying structure of the Microsoft .NET Framework. The .NET language has the ability to build XSDs and, even better, to infer XSDs from existing XML files. This is what we’ll be focusing on.
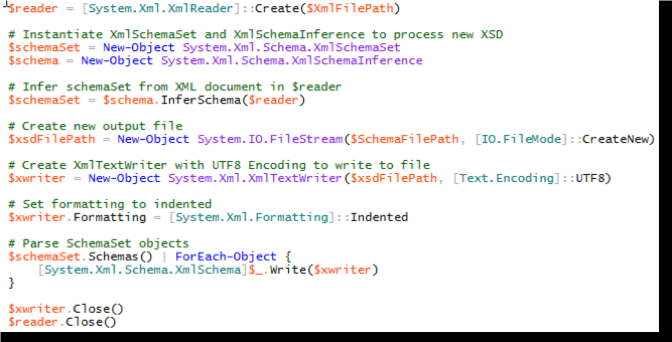
Building an XML schema with PowerShell
In the example above, we are reading an existing XML file, inferring a schema (XSD) from that file, building a new XSD file, and then writing the new schema into it. For a non-developer, this may seem daunting, but you don’t have to know this in order to build a schema from a XML file through the use of PowerShell scripts and functions.
By wrapping up all that code into a single PowerShell function, you can now simply specify an XML file to read and a schema file as output. This will result from a schema that can then be used to test your XML file against after any changes that are made to ensure the integrity of the file is maintained.

Simplifying XML Schema Creation
So how can you easily build an XSD schema from an existing XML file with PowerShell? The first task will be to download an existing PowerShell script that contains all the code necessary to read the existing XML file, create the XSD, and save it to a file.
One place this script can be found is on Adam Bertram’s Github repository. You can download the New-XMLSchema.ps1 script onto your computer and save it.
The script we’ll be using has a requirement of the PowerShell Community Extensions module. This is a module that has many useful functions, but the one you need is the Test-Xml function. This is a function that you can use to validate your schema against your XML file, but it’s also a requirement for the New-XMLSchema.ps1 script as well.
This module needs to be downloaded and installed as the first step. Then, on a Windows computer running PowerShell version 4 or later, open up the PowerShell console and dot-source the script into your current session. This method brings in all of the code inside of the <New-XMLSchema.ps1> script into your current session. It will then allow you to use the <New-XmlSchema> function inside of this script to greatly simplify the schema creation.
You’ll then need to locate the known-good XML file from which you will be creating the schema. In this example, we have an XML file called users.xml in C:\ that contains demographic data about various users of a certain business application:
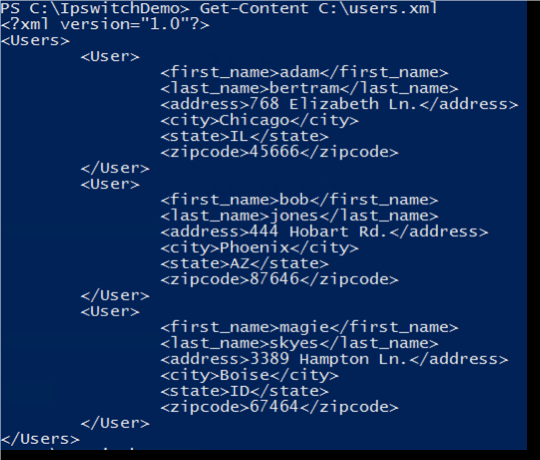
Example XML file
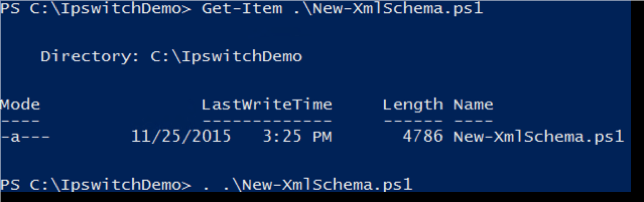
At this point, it’s just a matter of executing the New-XMLSchema function to build the schema XSD file:

Creating the XSD schema
You can then open up the XSD to confirm it has been created. For more help with XML schemas, be sure see our free white paper, Validating your Critical Data with PowerShell.
Taking PowerShell Automation to the Next Level
Now that you have a better understanding of how to leverage PowerShell, consider utilizing the tool to automate tasks, file transfers, and data security. Learning how is particularly beneficial with IT budgets tightening and work demands increasing. To keep up while minimizing mistakes and ensuring the effort and the results to automate tasks, transfer files and protect data meet the needs of the business and stay within budget, PowerShell can play a key role.